

MEP Drawing Checklist Before Construction Begins: What to Verify and Why It Matters
An MEP drawing checklist is a structured review tool used to confirm that mechanical, electrical, and plumbing drawings are complete, coordinated, and ready for construction. It covers drawing control, code requirements, equipment data, system routing, clearances, structural interfaces, and final sign-off. Using it before construction begins helps teams identify potential conflicts before they lead to rework, RFIs, or schedule delays.
Most field problems we see trace back to a drawing set that looked finished but was never cross-checked. A thorough pre-construction checklist helps catch these issues before construction begins. If your drawings are still being developed, professional MEP drafting services can help prepare them for review. The following guide explains how mechanical, electrical, and plumbing systems are coordinated on a single plan.
What Is an MEP Drawing Checklist?
An MEP drawing checklist is a working tool that engineers, drafters, project managers, and contractors use to verify that every mechanical, electrical, and plumbing sheet is ready for the field. Each line asks a single question: Is this sheet complete, consistent with the other trades, and buildable in the space we actually have? Anything that fails gets flagged and fixed before the set is released.
It is the last gate between design and construction. It does not replace engineering judgment. It simply makes sure nothing gets skipped when the schedule is tight and everyone assumes someone else already checked.
Why Review MEP Drawings Before Construction Starts
A pre-construction MEP review costs very little next to the price of skipping it, and an MEP drawing checklist is the simplest way to run one. Moving a duct on paper takes minutes. Moving one after the slab is poured or the ceiling grid is up takes a crew, a lift, and a change order.
The usual culprits are:
- Ducts, pipes, and conduit competing for the same ceiling space.
- Equipment that does not fit its room or lacks service clearance.
- Panel schedules that do not match the loads on the plans.
- Sleeves and openings missing from the structural drawings.
- Sheets issued over outdated architectural backgrounds.
Each of these is easy to catch on paper and expensive to catch on site. A written review process turns them from surprises into routine checks.
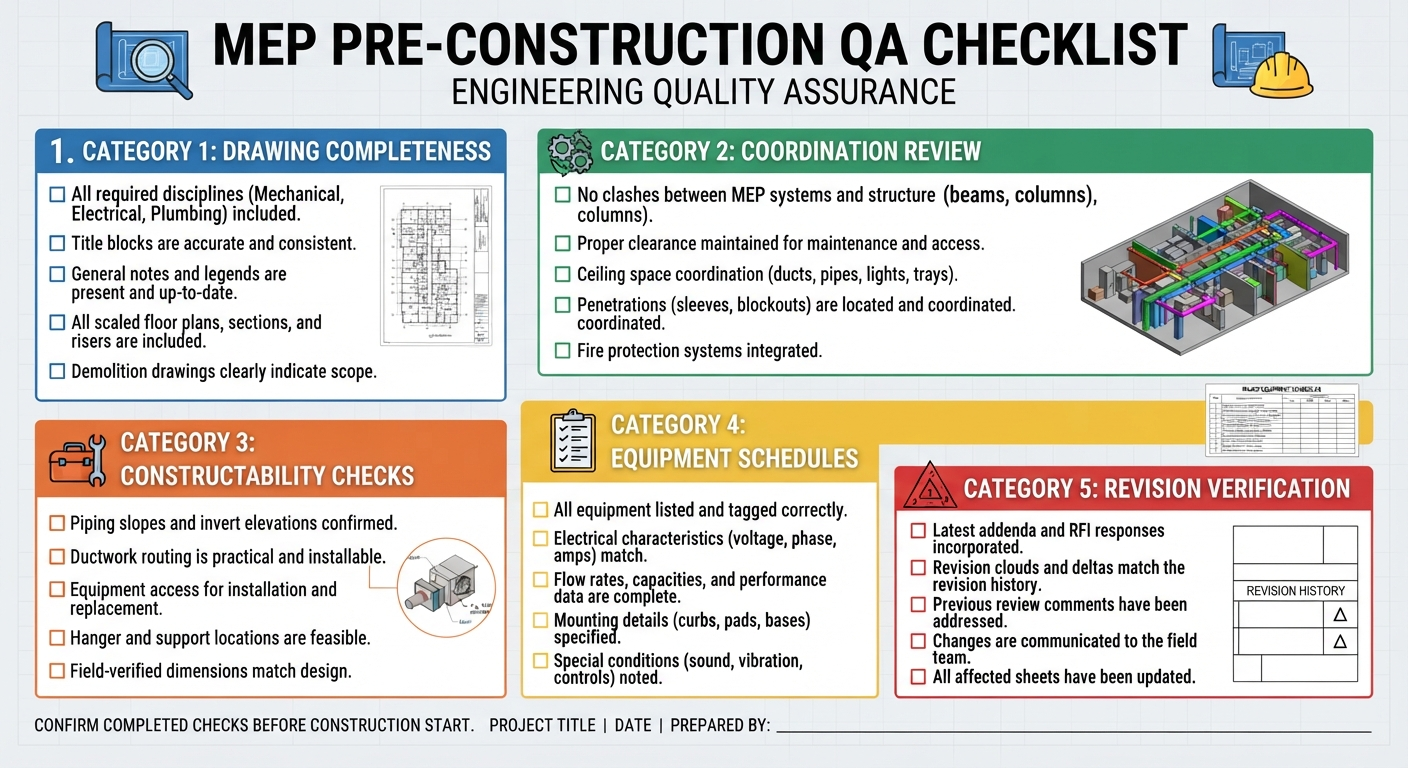
MEP Drawing Checklist: 10 Steps Before Construction Begins
Work through this MEP drawing checklist in order because each step depends on the one before it. Copy it into your own QA template and mark every item as Pass, Fail, or Not Applicable.
Step 1: Confirm the Drawing Set Is Controlled
Start the review with document control. A beautifully engineered set is useless if the field builds from the wrong revision.
- Sheet index matches the sheets actually issued.
- Revision clouds and dates are current.
- Title blocks show the correct project name, number, and issue status.
- Architectural and structural backgrounds are the latest versions.
- Grid lines, north arrows, and scales agree across all disciplines.
Step 2: Check Code and Jurisdiction Requirements
- Applicable codes are listed on the cover sheet (IBC, IMC, IPC, NEC, NFPA, and local amendments). Verify the applicable editions and local adoption requirements using the International Code Council’s building code resources
- Energy code compliance is documented (IECC or ASHRAE 90.1, as adopted).
- Earlier AHJ comments have been addressed.
- Accessibility clearances are shown at fixtures and controls.
- Fire-rated assemblies are identified wherever MEP systems penetrate them.
Step 3: Review Mechanical (HVAC) Drawings
For the mechanical review, focus on whether the equipment actually fits and can be serviced.
- Equipment schedules are complete, including capacity, airflow, voltage, and weight.
- Duct sizes, insulation, and pressure class are noted.
- Diffuser and grille layouts match the reflected ceiling plan.
- Air handlers, RTUs, and VAV boxes have access and service clearance.
- Condensate drains show slope and a termination point.
- Thermostat and control point locations are shown.
- Fire and smoke damper locations line up with rated walls.
Step 4: Review Electrical Drawings
Electrical errors tend to hide in the schedules, not the plan view, so check the numbers first.
- The single-line diagram matches the panel schedules.
- Load calculations support the service size and breaker sizing.
- Panels and switchgear have the required working clearance.
- Feeders, conduit routes, and homeruns are shown for major runs.
- The lighting layout matches the ceiling plan and fixture schedule.
- Emergency and egress lighting circuits are identified.
- Grounding, fault current, and arc-flash notes are included.
Step 5: Review Plumbing and Fire Protection
The plumbing and fire protection sections of an MEP coordination checklist are often reviewed last and rushed, which is exactly when slope and access problems slip through.
- Fixture counts meet code and match the architectural plans.
- Waste and vent lines show size, material, and slope.
- Riser diagrams agree with the floor plans.
- Water heater, backflow preventer, and pump details are complete.
- Sprinkler head layout is coordinated with lights and diffusers.
- Cleanouts and shutoff valves are accessible.
Step 6: Coordinate Across Trades
This is where the review process earns its keep. Overlay every trade and look for hard clashes, where objects physically overlap, and soft clashes, where a clearance or access zone is blocked.
- Hard clashes between ducts, pipes, conduit, and cable trays are resolved.
- Access, service, and code clearance zones are respected.
- Coordinate gravity-drained lines early, considering required slopes, available space, and other systems.
- Ceiling heights are checked against the lowest MEP element.
- Shared hangers or racks are drawn and their loads confirmed.
- Review MEP coordination drawings to ensure all building systems are properly coordinated across disciplines.
Step 7: Verify Structural and Architectural Interfaces
At this stage, architects, structural engineers, and MEP designers must agree on the interfaces.
- Beam penetrations, sleeves, and openings are shown and approved by the structural engineer, with the rebar detailing process considered to avoid conflicts with structural reinforcement.
- Housekeeping pads, curbs, and equipment supports appear on structural sheets.
- Rooftop unit loads are confirmed.
- Shafts, chases, and rooms are sized for the equipment and routing shown.
- Wall types match, especially at fire-rated assemblies.
Step 8: Check Shop Drawings and Submittals
Treat this as your MEP shop drawings checklist. Placeholder equipment sizes are one of the most common reasons a clean-looking set fails in the field.
- Submittal list matches the equipment on the schedules.
- Shop drawings reflect approved equipment dimensions, not placeholders. Follow the shop drawing submittal process to verify that submitted drawings and equipment details are properly reviewed.
- Long-lead items, such as switchgear, chillers, and transformers, are identified with order dates.
- Manufacturer weights, connection points, and data agree with the drawings.
Step 9: Cross-Check Quantities and Scope
- Material counts reconcile to the drawings using an accurate material takeoff to support quantity verification and material planning.
- Allowances and exclusions are documented.
- Alternates and value engineering items are reflected.
- Scope gaps between trades are assigned to someone.
Step 10: Final Sign-Off
Finish the MEP drawing checklist with accountability. A review nobody signs is a review nobody owns.
- The lead for each discipline initials the relevant sheets.
- Open comments are logged with an owner and a due date.
- The set is issued as For Construction only after every item is closed.
- The transmittal records who received which revision.
Common MEP Drawing Mistakes This Checklist Catches
Teams that skip the MEP drawing checklist usually find these problems on site instead of on paper.
| Mistake | Impact | Fix |
| Ducts routed under beams with no height check | Ceiling drops and redesign after steel is up | Verify the lowest MEP element against finished ceiling height (Step 6). |
| Panel schedules not updated after load changes | Undersized breakers and failed inspections | Reconcile the single-line diagram and schedules (Step 4). |
| Missing sleeves and core locations | Field coring and structural review delays | Send the penetration list to the structural engineer (Step 7). |
| Equipment sized from placeholder data | Unit does not fit, or connections do not match | Compare against the approved submittal (Step 8). |
| Old architectural background | Walls and fixtures in the wrong place | Confirm reference file versions (Step 1). |
Who Should Own the MEP Drawing Checklist and When to Run It
Review responsibilities should be defined by the project team, contracts, and applicable requirements. The engineer of record, drafting team, and MEP coordinator may each have different review responsibilities.
Run the review twice: once at roughly 90% design, when changes are still cheap, and again just before the set is issued for construction. A second reviewer who did not draw the set will find things the original team no longer sees.
Keep a log of every flagged item, who owns it, and the date it closed. On larger projects, that log becomes proof that a pre-construction MEP review actually happened, which helps when responsibility is disputed later.
Tips for Making the Checklist Stick
A short MEP drawing checklist used consistently beats a long one used once.
- Use the same checklist on every project so reviewers build the habit.
- Tailor it by building type: hospitals and labs need additional checks for pressure relationships, medical gas, and redundancy.
- Do not skip it on small tenant improvements, where ceilings are usually tighter.
- Review in a model viewer or on overlaid PDFs rather than sheet by sheet.
Conclusion
Construction rarely goes wrong because a crew was careless. It can go wrong because two drawings disagree and nobody catches it. A consistent MEP drawing checklist is a practical way to reduce avoidable coordination problems. Control the set, verify each trade, coordinate across disciplines, confirm submittals and quantities, then sign off. Do that, and the field spends its time installing instead of asking questions.
Need Your MEP Drawings Checked Before You Build?
If your team is dealing with tight ceilings, conflicting trades, or an incomplete set, EngineeringGeni’s drafters can review and correct your drawings before they reach the field.
Contact our team to put your set through a full MEP drawing checklist review and get it construction-ready.
FAQs
1. What Should an MEP Drawing Checklist Include?
A complete MEP drawing checklist covers drawing set control, code compliance, mechanical, electrical and plumbing details, fire protection, cross-trade coordination, structural and architectural interfaces, submittals, quantities, and final sign-off.
2. When Should MEP Drawings Be Reviewed Before Construction?
Review them at about 90% design and again before the For Construction issue. Repeat the review whenever a major architectural or structural revision is issued.
3. Who Is Responsible for Checking MEP Drawings?
The engineer of record, the drafting team, and the contractor’s MEP coordinator all share the job. Ideally, someone who did not produce the drawings signs off.
4. Is an MEP Drawing Checklist the Same as Clash Detection?
No. Clash detection finds geometric overlaps in a 3D model. An MEP drawing checklist is broader: it also checks codes, schedules, clearances, submittals, and documentation.
5. How Long Does a Pre-Construction MEP Review Take?
A small tenant space can take a day or two. A multistory commercial building may take a week or more, depending on model quality and how many trades are involved.